Sharing the Space – a DIY Vegetable Garden
Read MorePosted on: Apr 07, 2020Raunie

A vegetable garden is within your reach to achieve! With the uncertain times ahead we all share a similar thought: how can I help? Integrating a home garden within a healthy lawn can help in so many ways. Whether it be adhering to social distancing by limiting trips to the grocery store or by continuing to help keep our air clean with healthy green spaces which filters carbon and produce oxygen. But in all honesty, it’s also a lot of fun!
Dr. Green will be sharing a series of articles with steps over the coming days that will help you create a small space on your property that is both productive and relaxing.
Step one: Supplies For Your Vegetable Garden
- 6 – 4x4x8 posts – *not pressure treated and preferably cedar*
- 8 – 1” lengths of rebar
- Power drill with long bit *be sure it is large enough for the rebar to pass through*
- 1 weed protective blanket
- Soil
- Variety of favourite veggies
Once you have your hands on all of these supplies you can get started!
Step Two: Pick Your Garden Space
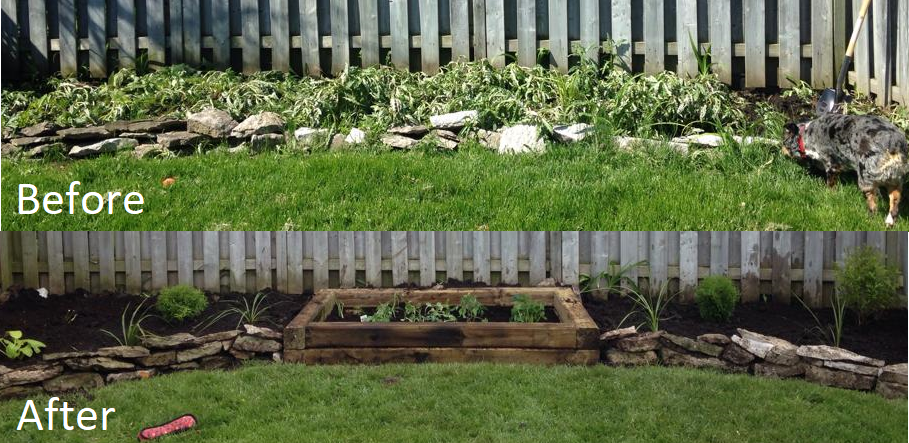
You will want to pick a space that gets a lot of sunlight – in my example I chose along the back fence of my property. Not only was this space filled with weeds before and had no real purpose, it also gets sunlight between 10am and 4pm during the summer months so it’s an optimal place to start my home vegetable garden.
Step Three: Prepare Your Garden Space
Then it’s time to cut down the posts to the right lengths. Ultimately, by getting 8’ posts it limits the project to only 2 cuts: take 2 of the posts and cut them in half. This will give you a garden that is 8’ long and 4’ wide, plenty of space to produce a number of yummy veggies you can eat all summer long.
Next it is time to drill the holes for the rebar. This step is critical for the stability of the garden. It keeps everything in place. Drill a hole 6” in from each of the edges of all pieces: a critical tip: measure twice, drill once.
Once you have the materials prepared you can dig out your space. Be sure to dig a few inches deep and try to keep the bottom of the garden as level as possible.
Next, lay the weed block protective blanket down. This step significantly helps reduce weeds popping up within your veggies making the maintenance much easier throughout the growing season.
Step Four: Put it all Together
- Lay the first layer of wood down in a rectangular shape with the two 4’ pieces on the inside and square out the edges
- Place rebar in holes and use a sledge hammer to pound 6” into the ground
- Lay second layer of wood through the holes and use the sledge hammer to level out the rebar to the top of the wood
- Finally, you can fill it with soil and plant away!
The next article will cover how to start your seeds inside so when the weather turns a little warmer they’re ready to go into the soil of your beautifully built home garden.
In Conclusion, we hope that you stay safe, stay healthy and stay productive folks! We’ll get through this together.

